ICP-OES#
This is located across from the biochem lab. The instrument is the “super old machine along the wall”.
This method was adapted from the Leeman Lab Profile
Starting the ICP-OES#
Check integrity of torch and spray chamber assemblies—two doors on the right side of instrument. Check for any cracks, scratches, etc. Be sure to close firmly when done to reset the interlocks. (Check tubes ensure that nothing is cracked or worn)
Turn on the green power light on the ICP-OES.
Clamp pump.
Attention
DO NOT mess with the spring tensions. (All 4 get clamped)
Power on the LYTRON MCS recirculator (under bench, switch on front panel). Check the water level in viewer below switch. Also check waste jug. Find a new container if full.
Hint
Make sure that it is plugged in (You should hear a fan kick on… low hum)
Start the software on the computer — WinICP
Check the status box (want to see IDLE). The protocol should be METL2014. Also check for interlock error messages.
Turn on both in-use gas supplies completely. Make sure the outlet pressure is between 80 and 90 psi. (In the corner you will see a cluster of gas canisters and valves on the wall)
Make sure that there is 5% HNO3 in the rinse trough (white plastic near the instrument needle).
Warning
Don’t place the volumetric flask of HNO3 next to the wires or else rust will affect the wires (as can be seen).
Then, place the auto sampler tip in the rinse using the software: “Scan” tab, ‘To Rinse’ in lower left window.
On the software, choose the “Control” tab. Click “Cold Autostart” and monitor the progress. The argon should be on, the air pump on, after about 60 seconds a click should occur, and the plasma turns on (Bright blue light in the window of the instrument door). Make sure the peristaltic pump (outside of the instrument with the greenish tubes) is turning and liquid is flowing into and out of the instrument through the tubing. You should see liquid flowing through the tubes through the pump. It is a good idea to recheck argon tank output pressures at this point.
Tip
Have someone designated to check the plasma every few minutes to make sure that it is not put out by the liquid because then you will have to reignight it.
Open a new data set (File, New DataSet). Use Julian calendar (very end of this manual) to name, a copy is found on the computer or the last page of this document. Ex. 0602022 was used for March 1, 2022.
Wait 30 minutes for the plasma to warm. It will take 60 minutes to make your standards, fill sample trays, and sample ID page. It is good idea to start prepping your series of standard solutions while the machine warms up!
Making Standards and Filling the Autosampler#
It is now time to make the standards and fill the Autosampler. Choose the rack editor (funky dot filled rectangle between DB down arrow and the red “Stop”. Choose a “new file”, make sure it has 44 cups and save to RackFiles folder on
C:/. You are very limited to what you can have as the title (Only 8 characters, no spaces, no special characters). Be sure to record what you use for your title in the book so both yourself and others will know how to find it.Sample ID’s are 10 characters. You can autofill (say all have same start, type that start, highlight samples with that start, touch autofill on the top bar of the screen. Or you can sequences, same rules except touch sequence on the top bar of the screen.
Caution
Be specific, no duplications since the last step will average numbers for any sample with the same name (does not matter if they were ran on different days or not)
Samples go into one of the 44, 15 mL tubes — fill to a little over height of the rack; standards go into the 14 larger cups. This lab you will only be using the larger standard cups for the standards! (Unknowns are a different story)
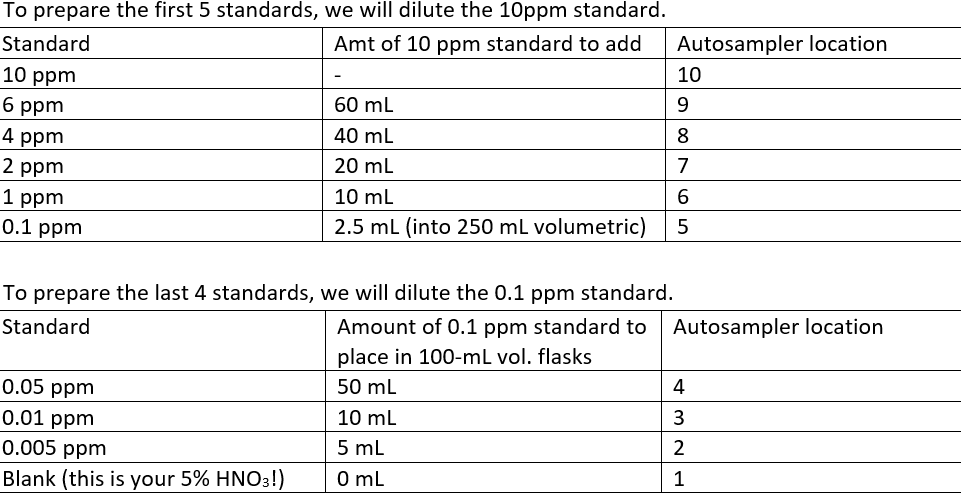
Making the standards: We prepare a series of 11 metal standards. There are labeled volumetric flasks for each standard as well as labeled tubes for each standard.
The easiest approach is to make a large volume of 5% nitric acid and use it as the solvent in the flasks in place of distilled water. Basically, just add 50 mL of the 69-70% HNO3 to the 1000 mL V. Flask. Remember to have a little bit of DI water in the flask before you add the acid, then once the acid is added you are good to fill to mark.
Danger
USE GLOVES WHEN WORKING WITH CONCENTRATED NITRIC ACID (This is the highest concentration of nitric acid possible in aqueous solution… fyi)
If you spill or splash some on yourself, immediately notify your instructor so that the spill kit can be obtained… in the meantime remove your gloves and rinse the area with copious amounts of water at the sink
If you spill some on the counter, be sure to clean this up with the kit as well otherwise someone may unknowingly place their elbows, hands, laptop, notebook etc. on the counter and begin to wonder why their skin is burning…
First let’s prepare the 10 ppm standard. Screw up this one, and it’s all over … Add three 833 μL aliquots of the purchased stock (PlasmaCAL custom multielement standard – don’t screw it up! This was $300 for a bottle) to the 250 mL volumetric and dilute to the mark with the appropriate solvent (5% HNO3, the one that you prepared in the 1L bottle). Invert to ensure proper dilution
Follow the standard prep using the table below
After filling all standards with appropriate solvent to the line, invert and mix 15 times. Fill all the standard tubes (The large ones in the rack by the instrument! 2.5 cm diameter) and place in the Autosampler rack in their appropriate positions. They should already be in their correct spot and if they aren’t… well good luck
To prepare the 10 ppm Mn/Fe standard, add 1 mL 1000 ppm Mn and/or Fe. Fill with 5% nitric to the line. Invert, and mix. Fill the standard tube and place in Autosampler rack cell location 14.
Running the ICP with your prepared standards#
After the standards have been made and the ICP has had time to warm up, press “scan” tab and “Peak Optics”. Run “Full” while observing the waveforms. The signal should be near the middle of each peak.
After “Peak Optics” has been run, it is now time to position the plasma with respect to the detector. Move the tip to cup 14 (this is where your Mn and Fe only standard should be). Press “to cup” and from the drop down next to that option, you can choose which cup. Watch the tip move to cup 14. Allow 2 minutes. Make sure “axial” metals button is pushed down. Select “position plasma”. In that tab, select “run manual”. Make sure the signal is aligned in the middle of each peak (Red vertical line, adjusted by clicking the up arrow next to the graph). Press “Accept”. Do again. Repeat if needed until the signal is in the middle of each peak. Move tip to rinse and rinse for two minutes. (Why 2 minutes?? The long tube needs to completely empty out before drawing up a new solution)
Now we need to optimize the wavelengths. After the 2 minute rinse, move the tip into the highest concentration standard (10 ppm; cup 10). Allow 2 minutes. Enter a “Scan ID” and press “Scan”. Review all the metals as they produce their peaks. Make sure the signal is in or close to the middle of each peak. If the line is off center by 2 or more steps, call Dr. Hallen or Dr. McCurry. (This probably won’t happen… it would have to significantly be off. The red line would be WAY off on the side of the peak)
Return to tip to rinse and rinse for another 2 minutes. Set a timer.
To run the Standards, go to the “Standard” tab. Select the standards to be run (left side, Std. 1, Std. 2….to how many standards you have…usually 10 standards). Individually select the replicates to be run (Rep 1, Rep 2, Rep 3). Check C2, C3, and C4.
Select “Stnd auto” and the tip should move to standard 1. You will need to look at the calibration curves in the database (DB down arrow) and “Accept all lines” (as long as Rho = .975) to proceed once all standards have been run. Then hit RN (up arrow) to place the curve into the run window.
If you find a standard curve that is skewed uncheck the intensity that is significantly different to acheive a better Rho value.
For Samples, go to “Sample” tab. Select the rack file that was saved for the samples to be run today. Set both the “start” and “end” cups (i.e. if you only have 22 samples, start cup is 1 and end is 22). Select “Run auto”.
To view Results (while the samples are being tested), use the “report” tab. To view the results to print them, you must use the DB to view the results. Once in this tab, select the “report” tab and choose the specific data set in the right corner you wish to view. In the lower window, you can choose which file you want to see the samples. Check the boxes of the Sample IDs you wish to print. You can “generate” a report to viewer, printer, or data file. The report will need to be exported to Excel. On the desktop, there is a file Leeman Lab Profile Word docx. If you open that, at the end there will be very confusing instruction on how to do so… it would be best to just ask Dr. McCurry
Shutting Down the ICP-OES#
Once the samples are complete for the day, in the control tab, select “Extinguish after rinse”
The rinse solution should be parafilmed. When the time expires and torch extinguishes, unclamp the pump, turn off the gas and recirculator. Shut down the software.
Now you must obtain your data into an excel document… good luck