Instrument Calibration#
An instrument must be calibrated every day or the values coming out of its readout device are not worth writing down. There are several methods for calibration. None of these methods is “best” for all instrumental methods and a technique perfect for one method might be atrocious for another. Picking the proper method for calibration can make or break your analysis. Every instruments response (\(R\)) can be equated to the quantity of analyte being measured (\(Q\)) times the instrumental and physical constants, unit conversions, etc. (\(k\)) that go into each particular technique. The resulting response equation:
is the foundation for each of the calibration techniques.
Calibration or Working Curve#
This is the most common of all the calibration techniques. It is useful for running multiple samples as long as all sample have a similar and simple matrix. In a calibration curve approach, the samples and standards must have similar chemical matrices. A changing matrix can yield a changing response as interferents become involved (thus \(k\) is no longer constant).
To obtain a calibration curve, a series of standards are prepared that bracket the sample concentrations, usually with at least two standards above and two standards below those values for the samples. The instrumental response is then obtained for a blank, for each standard, and for the sample. The resulting data are plotted as concentration of standards or ideally “quantity” of analyte in each standard vs. instrumental response. The standards are generally chosen so as to fall into the linear dynamic range of the instrument being used. This simplifies the data reduction to using the equation for a straight line and algebraically solving for the quantity in the unknown. All samples are diluted so as to fall near the center of the calibration curve. Plots (see Fig. 1) can be driven through the \(y\)-intercept as in most spectroscopic techniques or can have the measured blank response and a non-zero intercept.

Fig. 1 Calibration or working curves for both zero and nonzero intercepts.#
A single point analogue is not recommended unless a ballpark result is acceptable. To run a single point ‘curve’, the response of a sample and a standard are measured and a ratio is set up to calculate the ‘concentration of the sample’. You can get lucky and get very accurate results. You can also loose big time and with a single point — will be blissfully ignorant!
Important
Always measure and plot a Blank!
Standard Additions#
A standard additions approach is used when the matrix of the samples are unknown or too difficult to be matched. In these cases, the simpler calibration curve approach is not useful. As one can gather from the name, standard is added directly to the sample and response is measured. Again this can be done as a single point or plotting analogue.
The standard additions method can take several forms[1] depending on the instrumentation being used. To obtain a standard additions plot for a spectrophotometric analysis, several solutions are made containing an identical amount of sample and varying amounts of standard including zero added. Each of these solutions is then diluted to an equal volume and the absorbance is then read for each solution. The plot will be of quantity of standard added as the independent variable vs. instrumental response as the dependent variable. Please note that while the quantity can be concentration, solution volume, calculated mass, or any other representation of the physical amount of standard added, it will usually be identical to normal calibration plots so comparison of slope can be made to determine presence of a matrix effect! Alternatively, a plot can be made by measuring the response for the sample alone followed by measuring the response after small amounts of standard have been added to solution of sample. This method is useful for potentiometric or voltammetric methods or where the amount of sample available is limited. Correction must be made for the added volumes of the standard.
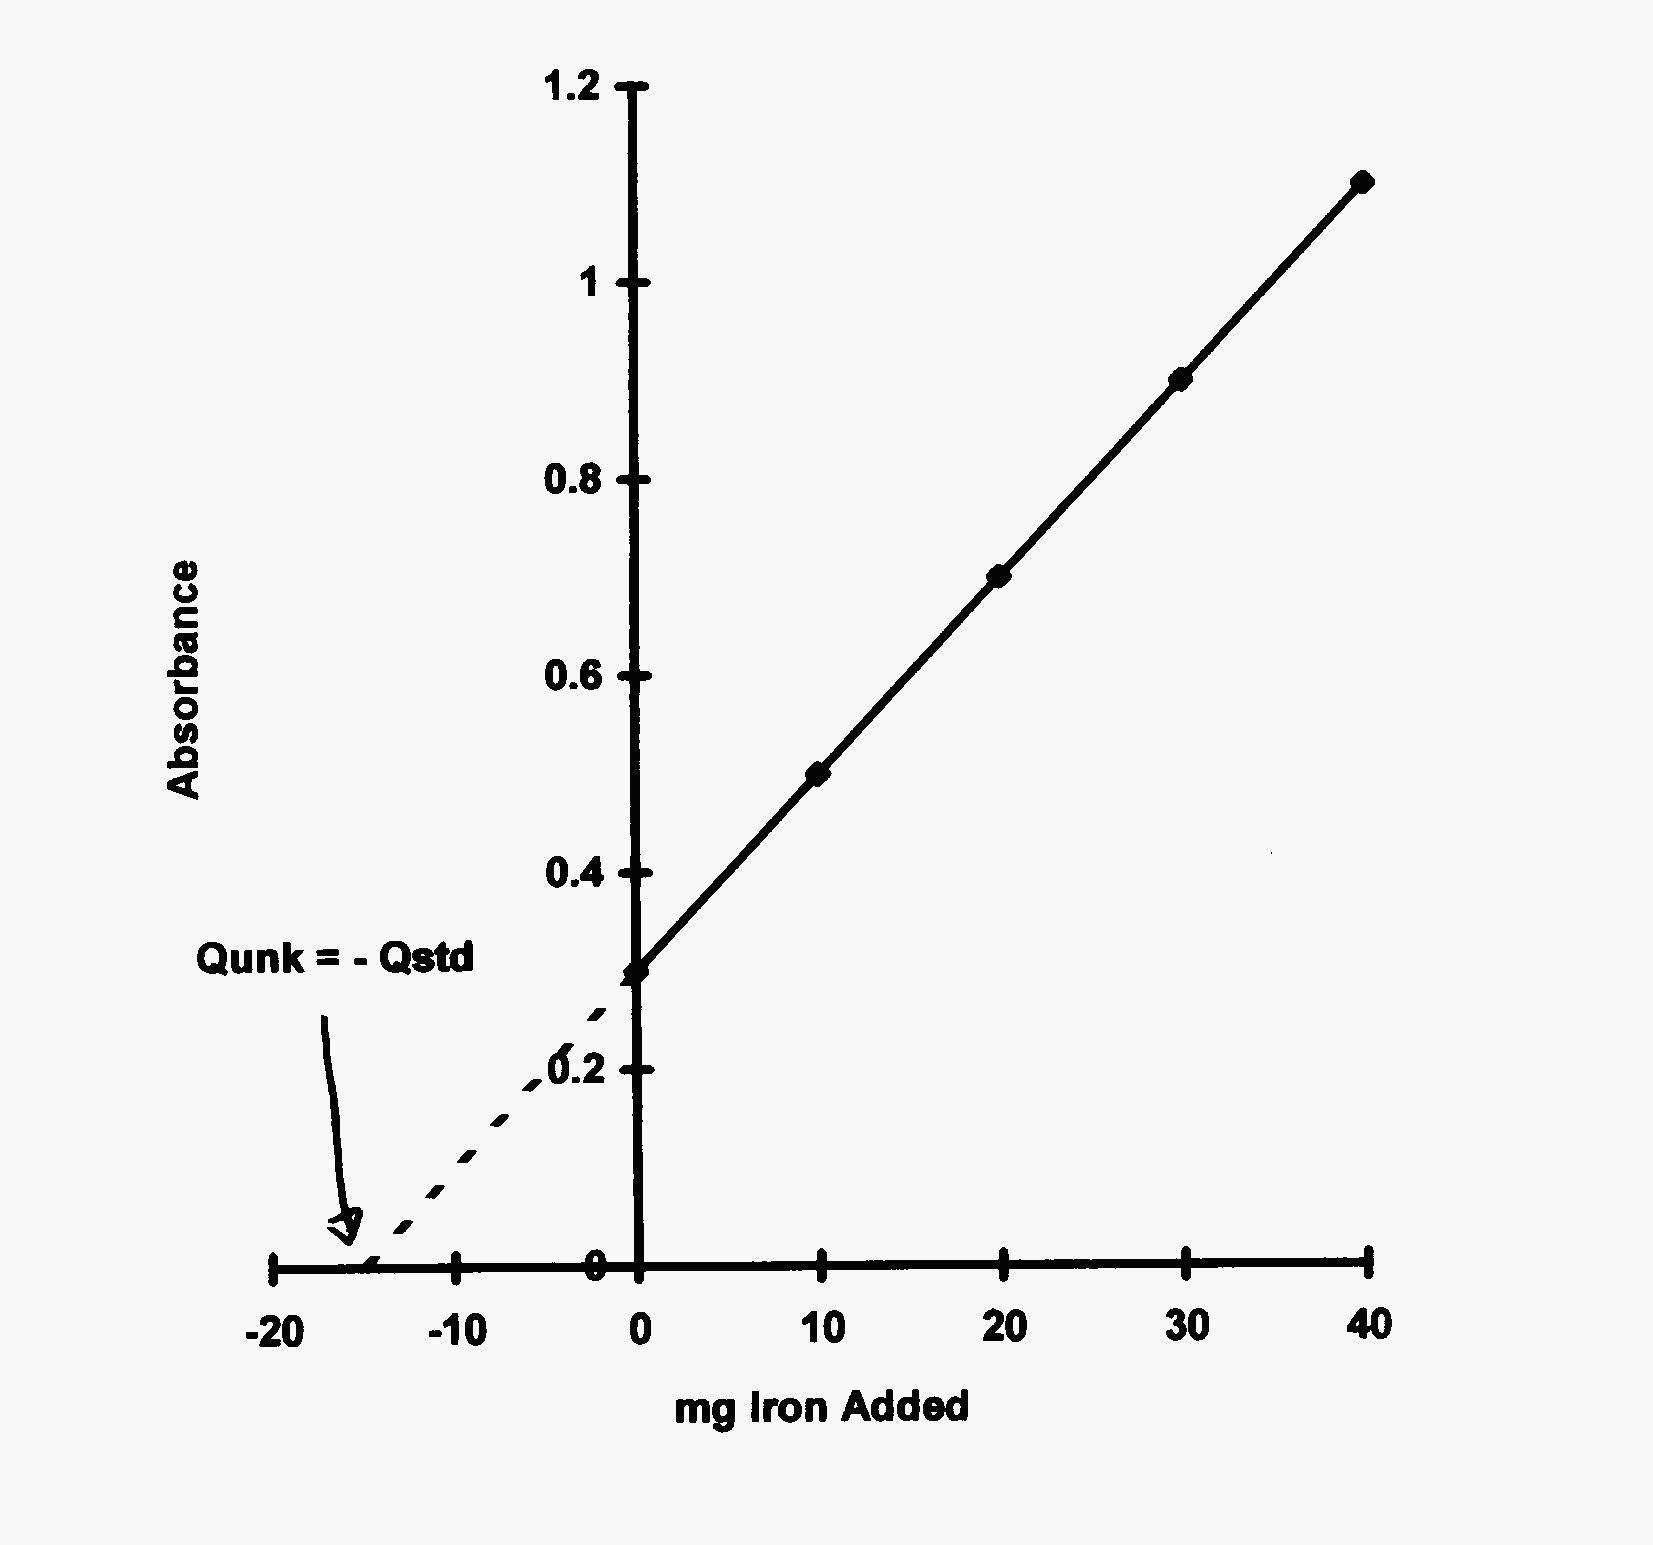
Fig. 2 Standard additions plot showing \(Q_{\text{unk}} = -Q_{\text{std}}\) for response of zero and no standard added.#
The mathematics on this have proven interesting to some students. The response equation for the plot is
or rearranging:
so a plot of \(R\) vs. \(\Delta Q\) as shown in Fig. 2 will have a slope of \(k\) and an intercept of \(kQ_{\text{u}}\). Incidently, if the matrix has no effect, the slope, \(k\), of the calibration curve and of the standard additions plot will be identical. Let’s solve the latter equation when the response equals zero:
So, the negative of the added quantity of standard will be equal to the unknown quantity of analyte in the sample. Make sure to correct all readings for the blank before plotting and use only linear plots.
Important
Standard addition plots must be linear and be blank corrected!
Internal Standards#
When the instrumental constants may also vary, the internal standard approach is used in conjunction with another calibration method. In this technique, a very similar substance having a similar response but in a different location (wavelength, potential, etc.) is used at a constant quantity in each sample of standard and sample. The response of the analyte is then compared to the response of the internal standard to balance out changing instrumental parameters. This is not a calibration method of its own.
The internal standard must be a material that
does not interfere with the sample
must be added in identical amounts to all samples and standards
must respond to instrument in a like fashion as the sample (constant slopes)
The resulting response equations are based on both the sample and the internal standard:
Let’s define a new constant \(Z\), where \(Z\) is the ratio of the individual \(k\)’s, \(Z = \frac{k}{k_{\text{IS}}}\) and \(Z\) must be a constant. So that any parameter affecting \(k\) will identically affect \(k_{\text{IS}}\). Substitution of \(Z\) into the above yeilds:
or rearranging:
A plot of \(\frac{R}{R_{\text{IS}}}\) vs \(Q\) will look like a standard calibration curve with the instrumental variability removed. Again, the blank must be corrected for.
Absolute Techniques#
In an absolute technique, the constants involved in the calibration curve are assumed to be known and used in the sample determination. For example, in a Beer’s law analysis, a species is known to have a molar absorptivity of 10,000 L∙atm/mol∙K. If a solution of the species in a 1.00 cm cuvette has an absorbance of 0.345, then the concentration must obviously be 3.45 × 10⁻⁵ M. Obviously as long as nothing instrumentally is changing the value of ε! A scratch on the cuvette would be largely negated by one of the above methods but not in an absolute one. Similarly, if a ISE meter is calibrated so that pH 7.00 has a value of 0.0 mV, then a solution of -118.32 mV must be pH 5 since pH changes by 59.16 mV per decade! Again, as long as the electrode knows it is supposed to change by 59.16 mV per decade. Perhaps a heart-to-heart talk? As you can guess, this is not a good choice unless you have lots of prior experience with the analyte and technique, usually with the past support of a lot of data indicating the constant has been invariant.